Monday, August 12, 2019

Skagit County Fair 2019!

I was on vacation during the Skagit County Fair this year, so my friend (and excellent quilter) Dianne Lowe entered my pieces and delivered them back to me!

I entered:

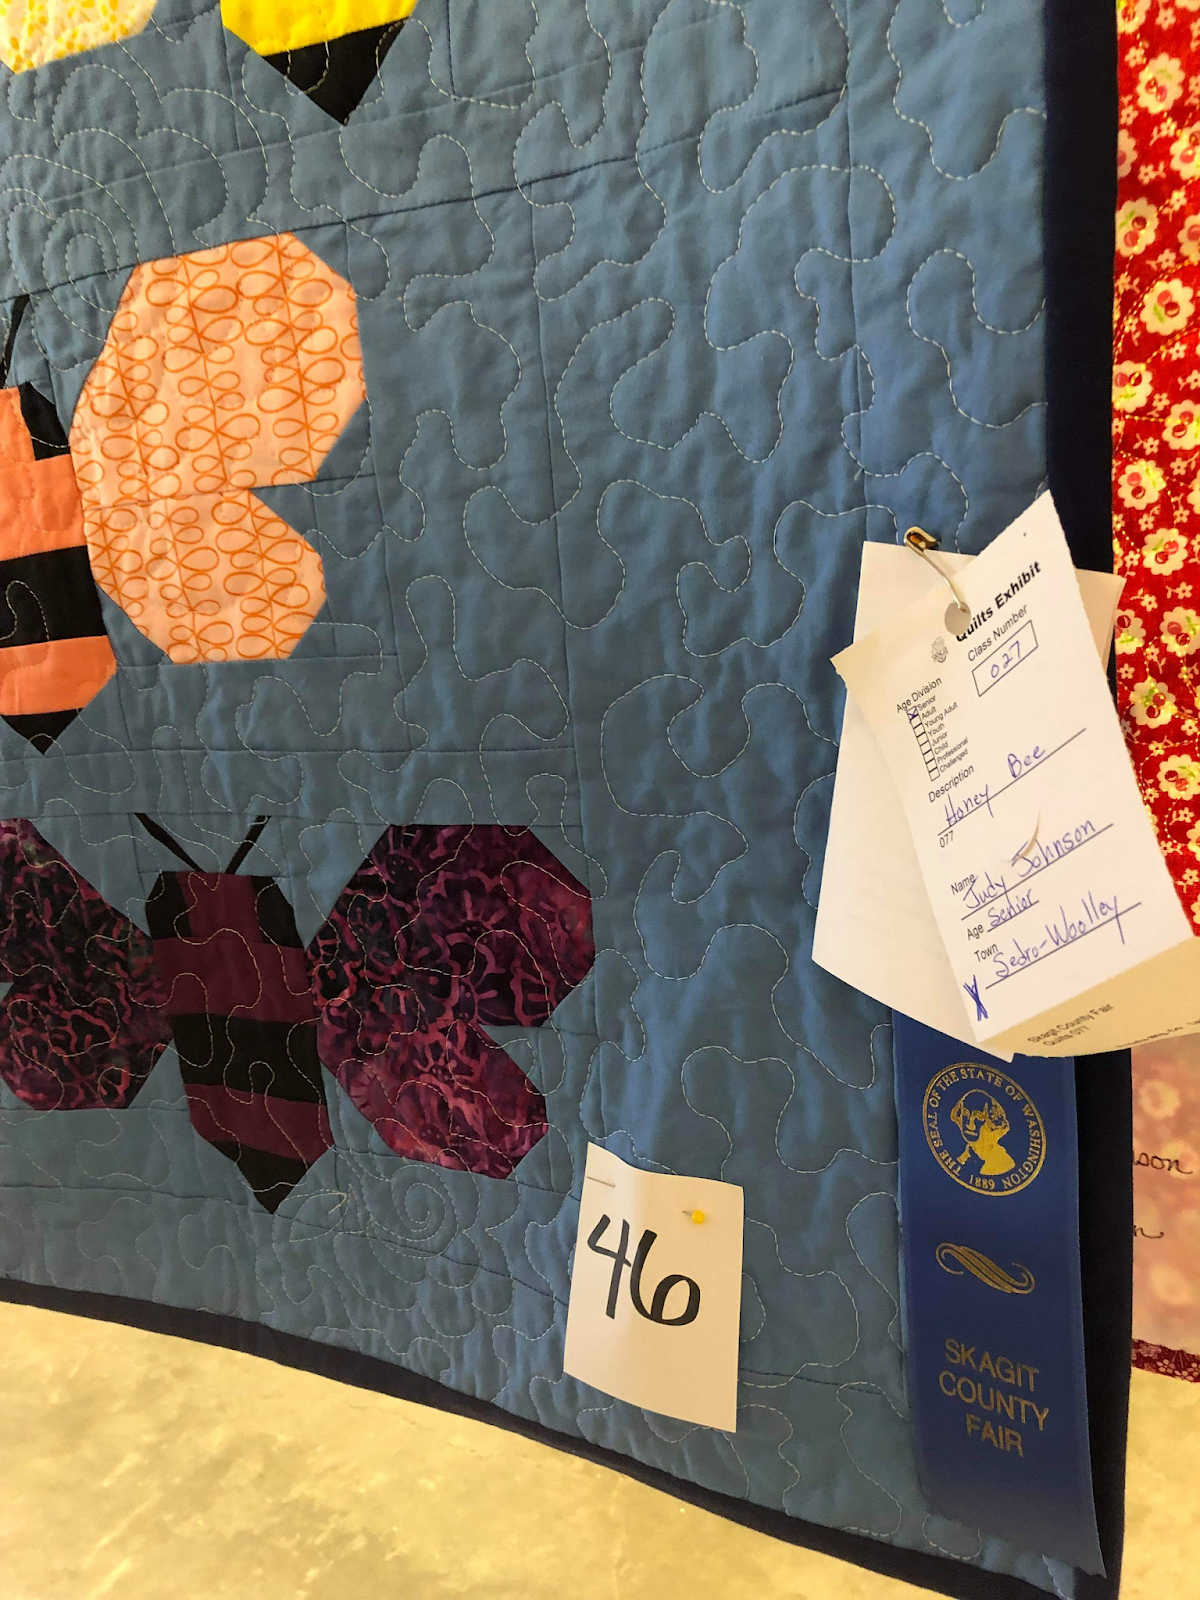
"Skagit Valley Honeybees" from a pattern by Elizabeth Hartman.  I used a blue-gray background fabric to represent the perennial gray skies of the Skagit Valley!  We have an active beekeeper's association group and I appreciate all they do to keep bees safe and buzzing.  Blue ribbon.


"Scrap Basket Cats" from a pattern by Kathy Love.  This was a UFO for me and I am so glad I completed it this year!  The original pattern uses four kitties - I wanted nine!  Red ribbon. But no photo of the ribbon...

Here's a secret:  I inked in the eyes and nose with a fabric marker.  No satin stitch for me!


"Christmas Angel Table Runner" from a pattern by Letitia Hutchings.  I had some Russian reproduction fabric that I had been hoarding, and got it out for this special runner.  It is always fun to use different threads for the different sections.  Table runners are a great place to experiment with threads!  Blue ribbon and Best of Class.

Oops, forgot to take a photo of the whole runner with the binding on...


Enter quilts in your local fair!  It's fun and you get good feedback from the judge.  And volunteer to help for a few hours or a day.  It's a great experience.  I usually do it but this year I was out of the country...

And THANKS to my friend, David Bricka, for the photos of the ribbons. 


Saturday, February 10, 2018

Quick tip - winding a bobbin!

Here is a quick tip for you - and anyone you are mentoring into being a quilter!

Don't overfill your bobbin.

Be sure that the bobbin thread, when wound, is well within the edges of the bobbin itself.  Not bulging out or stacked so full that the thread goes beyond the bobbin edge at any point. 

Your bobbin needs to spin freely within the bobbin case.  And some sensors may trip a warning if they see too much thread.

Wind your bobbin snugly - I run the thread, while loading, between my thumb and forefinger to make sure it has even tension and is loading the bobbin evenly.  I know that sounds a little compulsive, but it works really well.  And if the bobbin thread pops off the guides I am already holding it so it doesn't wrap around the spindle.

You probably can't get as much thread on the bobbin as they do at a factory that loads prewound bobbins.  Don't worry about that and don't go for the record...

Bobbin winding is a little Zen moment during the quilting process that reminds you to slow down and enjoy the meeting of needle, thread, fabric, and your own creativity.  Be mindful and have fun!

Wednesday, January 17, 2018

Who are your quilting mentors? I know mine!


I have been quilting for 40+ years.  I started as a self-taught, book-learned quilter in 1976 during the Bicentennial when historical crafts became the rage.  I muddled through my first few quilts, then took a few classes, and was swept up in the possibilities of quilting!

I have taken some great classes and learned from some great quilters.  So I was musing, at a four-day retreat this weekend, who has influenced my quilting life the most?

Indirectly, Jinny Beyer
I took my first formal classes from a quilt shop owner who had studied with Jinny Beyer.  Sadly, I have forgotten her last name, but her first name was Kathy and she owned a shop in Everett, Washington.  She taught us so well that I still use the techniques in every quilt!  This was before the rotary cutter revolution, and we learned to make and cut templates (with scissors) and to be accurate.  We hand-pieced, machine-pieced, hand quilted, hand-appliqued, machine-appliqued, used traditional blocks, and designed our own.  This was in my “hunter green and coral” period and the first quilt I completed in her class is still part of my collection.  Thanks, Kathy and thanks, Jinny, for starting my quilting journey!

 
I'd like to point out that this is hand-pieced and hand quilted!


Karen Kay Buckley
I took a class from Karen Kay Buckley in Ripley, West Virginia in the 1990’s and she taught me the basics of machine quilting on a domestic machine.  I do a LOT of free-motion quilting on my Elna and she might be pleased to know that she is partly responsible for MANY quilts for Project Linus.  I love to FMQ simple designs; it’s mesmerizing.  I have not taken the time to become an expert with custom designs.  I love the meander look and I don’t get too far from it.  Maybe a few pebbles, some flowers, tendrils, and leaves.  I made a bunch of pillows for kids a couple of years ago and quilted their names into the corners of the pillows for a subtle touch. 

Sarah Porreca
Sarah was a local quilting teacher in the Durham area of North Carolina.  I took classes from her in the 1990’s and a miracle happened – I learned to make a SQUARE log cabin block!  She also taught me to miter the corners of my binding, to crazy quilt, and to be fearless!  Sarah said, “If you make a mistake on a quilt or accidentally cut a hole in the top, applique a heart over it and the recipient will think you’re a genius.”  She was right! 

Sharyn Craig
Oh, my goodness, I learned a lot from Sharyn Craig about quilting efficiency!!  She surely is the original queen of chain piecing.  She had us slicing and dicing and preparing our pieces and units.  In piecing order on the left side of the machine and stacked for action!  And she came around to coach us and make sure we were set up for success!  I have used her techniques ever since and I have become a prolific quilter (ask my friends…).  When I sit down to sew I can put nose to the needle and go like the wind!!  She also taught me the value of pressing the seams “as they are sewn” first, before opening the seam to press again.  What a big difference in the crispness of my blocks! 

Quilters Newsletter Magazine
I was an early subscriber and thrilled that there was a magazine just for me!  With real news about the quilting world plus patterns and GREAT ADVICE!  I still go back and look at old issues – now that the magazine has ceased publication the old issues are like gold.  More than anything I think QNM taught me that I can make every quilt my own, whether using a traditional design or a modern twist.  Thanks to the editors and contributors to this magazine for the leverage they provided all of us into quilting for the love of it.

My Aunt Dollie
She taught me to thread a needle and embroider and do crewel work when I was just a tad.  Every time I thread a Chenille needle with pearl cotton I think of her.  She used to take care of me when my regular babysitter was unavailable or I was sick.  She had a cat named Kilroy.  We spent many hours with needle in hand and she was so patient and comforting. 

My high school boyfriend’s mother
My own mother hated sewing.  Clara opened the sewing world for me – taught me to make clothes, use the features on my machine, and most of all to embrace creativity!  She was one of those people who could take down the drapes and make a ball gown.  Without a pattern.  And it would be beautiful.  I was sewing in a vacuum until she mentored me; without her I would not be a quilter. 
 

Yes, I have taken a lot of classes from a lot of quilting teachers over the years and learned something from every one.  But I think of these people when I am using basic techniques and being thankful that I know how the machine works, how important accuracy is, and how to enjoy the process. 

Who were your quilting mentors?  Drop them a note of appreciation.  It is too late for me to thank everyone who has guided my quilting journey but I remember their good advice and will pass along the techniques to young quilters.  It’s a form of quilting immortality.


Thursday, November 30, 2017

Sunbonnet Mew! A friendship block quilt for 2017

Well, we didn't hold it up very straight...but here is my finished quilt, "Sunbonnet Mew"!


These are friendship blocks from one of my favorite quilting groups - Quilters by the River in Sedro-Woolley Washington.

Blocks were made from my directions and spec by each participating member.  I did the machine applique of the kitties, assembled the top, and quilted it on my Elna (domestic machine).  It really is square...

It is about 70" x 70".

The pattern is from the VERY popular book, "The Cat's Meow" by Janet Kime (Martingale Publishing).  This book was reprinted for its 10th anniversary so there are a lot of copies out there.  I have made more quilts from this book than any other I own!   The name of the pattern in the book is "Puss in Bonnets" but I couldn't resist calling mine "Sunbonnet Mew". 

Thread used for the machine applique was Invisafil 100 weight poly, DecoBob 80 weight poly, and YLI 100 weight black silk.  Bonnet detail was added with various 12-weight threads (yes, by machine). 

Quilted with Konfetti by Wonderfil, a 50 weight cotton in white.

I love this so much.  It will remind me of the happy days spent with my quilting friends.  If you have an opportunity to participate in a friendship block exchange with your guild or group, do it!  Be very specific about what you want in your blocks and create a special keepsake of your very own!


Quick binding tip!

When doing the "machine step" to apply binding, I almost never use a walking foot.  Even though there are lots of layers!

To make the quilt slip easier under my quarter inch foot, I bump up the stitch length.  For example, my machine's default stitch length, and the one I use for most piecing, is 2.5.  When applying binding, I go up to 3.0.  What a difference!  So much easier to do.  And I have bound HUNDREDS of quilts like this. 

So try it!  3.0 is a comfortable stitch length for your machine and still keeps the binding nice and secure.  


Photo shows machine step for applying
binding with a half-inch finish!


Look for this tip and others in my book, "Binding Your Best" - Easymade Publications.  See sidebar.


Sunday, August 20, 2017

Cat toys - recycle/upcycle!!

I love to recycle...

I love socks, especially cat socks...

When I wear my socks down to the threadbare point, I make cat toys out of them! 

Here's a quick overview:

Get out your old ratty socks and some scraps of quilt batting!  If the sock has a hole, just stitch it closed on your machine.  No fancy darning needed!  Use a couple of layers of batting, but what you see here is literally trimmings from a quilt that was longarmed. 

Make your stack a little narrower than your sock is long. 

 
Then the catnip!  Sprinkle it liberally over the batting. 
As you do for any dried herb, crush it between your fingers a little
to release more scent. 
 
 
Roll it up tightly.
 
 
Shove it in the sock!  If you have a pair where one sock is truly threadbare, use that one as your first sock and put the one in better condition over it.  Here, I'm just using one.
 
 
Almost done! 
 
 
I sew them shut in the cuff but I leave a little of the cuff dangling out for more kitty fun!


Be sure to trim any loose threads so that the cat doesn't ingest them. 
Thread swallowing is VERY BAD and involves a trip to the emergency vet.
 
 
All done!  Time for play!
 
 
Here's a demonstration from an earlier project.  These sock toys are very popular among cats who enjoy catnip (I believe the figure is about 75% who do).  If the scent fades over time, either discard the toy and make a new one or freshen it up with catnip spray!  
Yes, there is such a thing and it comes in a spritz bottle. 
 
 
Make some for all your kitty buddies!
 

Sunday, October 23, 2016

A trip to the Sydney Quilt Show 2016

I went to the Sydney Quilt Show!   June 22-26, 2016.  Australia has lots of great regional quilting events but this is the biggest.  With 400 quilts entered in 17 categories, 19 special awards, 80 sponsors,  and meet the teacher and guild demos that were too  many to count, this show was worth traveling 17 time zones to see!   


There were special exhibits, featured quilters, and an exhibit of past winners.  All spread out with plenty of room in the Glebe Island Exhibition Center.  But wait, there's more!
 
QuiltNSW partners with Expertise Events to add a huge vendor's mall with quilting and craft supply vendors from all over Australia.   Big vendors like the major sewing machine manufacturers (Toyota has a new candy apple red machine) and small  independent sellers of yarn, notions, and fabric.  They, in turn  provide a full schedule of lectures and demonstrations in three theaters over five days.  Something new about every 30 minutes.  You cannot see it all! 
 

Then there was Tula Pink!  For an additional fee, you could attend one of her three trunk shows and lectures, featuring quilts from several of her 500 fabrics and her mother as quilt holder. 


I attended the show four of the five days and the first Tula Pink lecture.  I selected several other lectures to attend, including Kathy Doughty's talk on combining fabrics and some interesting speakers on quilting techniques.   Thank goodness not all of the programs were about quilting!  Some were for knitters and scrapbookers, too. 

Australian quilters have a rich tradition of their own, even though they are heavily influenced by American quilting.  They still produce big, elaborate medallion-style quilts and use a lot of applique (especially in the borders).  More recently they are making vivid, complex color mixtures in new Australian traditions with large scale designer prints.  This was not a juried  show but the quilts were of very high quality with lots of innovation. 

It is still true that local teachers influence the local quilt production.   Quilters attributed their inspiration and design to local teachers and classes, and there were some similar patterns, color combinations, and techniques.   But with 400 quilts there was a wide variety, too!

I saw a big trend in using circles and circle blocks in quilts.  One popular teacher advocates a technique of adding a bias flange around circle blocks to make it easy to apply the circle to the background and to add a fun design element.  So there were lots of those.  Designers such as Jen Kingwell and Kathy Doughty also influence local quilters who are choosing the mash up of color and pattern that Australian quilters are becoming known for. 

I looked for information at the show and local museums on the traditional art of Aboriginal Australians and how that art is being used in fabric design but found nothing.  There was very little fabric for sale with these traditional designs.  It is more available in US stores than it was at this show and there was no information about the art. 
 
Attendees were cautioned against posting quilt photos on web sites or social media without the express consent of the quilter.  But official photos were taken for use on the QuiltNSW Facebook page and Instagram account so photos of the winners are easy to find on the Internet.   Best of Show went to "Rachaeldaisy " for her entry "Whizz Bang", a wild melange of circles, prairie points, and applique that is sure to influence a new generation of quilters.  Look for her website (Google Rachaeldaisy) and get out those circle blocks and templates if you want to do as the Aussies do! 

 
2016 Best of Show "Whizz Bang" by Rachaeldaisy